Dear Hosting Diary,
As part of my fun partnership with the American Express Blue Cash Everyday Card, I’ve had the fun opportunity to add elements of epic to my everyday. If you know me, you know I love a dinner party. I try to have dinner with friends at least a few times a week and I love hosting. I also love making gifts for people, so today’s post was inspired by two of my favorite things: giving people stuff and making them come over to keep me company while we eat together.
If you’ve been following my adventures the past few years, you may already know that I have a major candle fetish. My favorite ready-made candle of the moment is the Chivalry candle from Avant (it smells like sandalwood and leather) but I also love making them myself. I discovered a fun website called last year and they basically sell everything you need to make candles. If you want to learn to make candles, I’d suggest starting with their Starter Kit (they accept Amex, so you can rack up Blue Cash Everyday points when you order). I’m gonna go over the basics here, but the process is pretty easy.
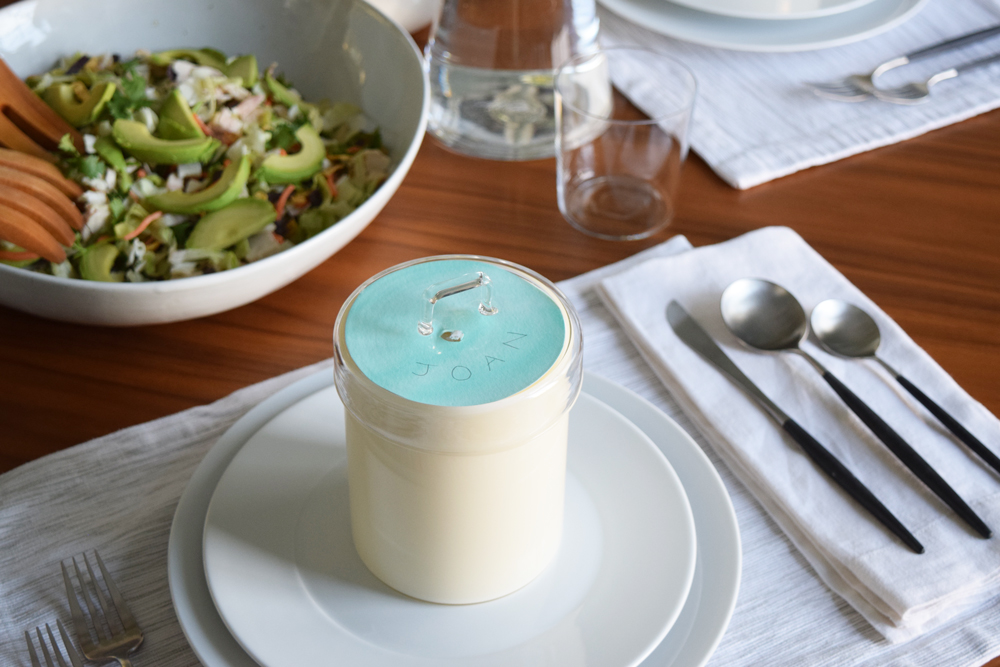
So what do candles have to do with me hosting a dinner party? I’m using them as a fun/cheap/glam takeaway gift that also serves as a place card. True, you don’t really need assigned seating at a small dinner party like the one I’m throwing, but it adds a little something special that will make the evening a little more epic. Since I own all the candle stuff already, it’s pretty cheap to make them now (the initial investment of the kit is about $60 and the wax/scents are pretty affordable). Good candles can cost $60-$150, so making one for around $15 is a fun/great way to give your guest a luxe present.
Step 1: Adhere wick to the bottom of your container, straighten it with wick bar. (You can see what all these things are here).
Step 2: Add Wax (I use this soy wax).
Step 3: Melt wax, add fragrance (I used “Fireside”), allow to cool to 135 degrees.
Step 4: Pour candles (don’t worry they’ll turn white/ivory once they cool).
Step 5: Remove wick bar.
Step 6: Trim wick (just as an FYI, you’re supposed to trim the wick after every burning, usually to about 1/4″).
*To keep this post from getting too long and boring, I’ve summarized this process a bit. Any candle kit you purchase will come with more complete directions.
Step 6: Use your container to trace a circle onto watercolor paper.
Step 7: Using your scissors, bore a hole for the wick. I used a chopstick to smooth out the hole. Write each guest’s name on your freshly-dried watercolor topper.
Step 8: Insert the card into the candle and add the lid (I used these cute vessels).
I don’t really know anyone named Joan, but if I did she would ALWAYS be invited to my dinner parties.
“Hey, Joan! I love that wig! Where’d you get that pantsuit?”
Since I live in Southern California and it’s going to be summer for at least two more months, I love serving a simple, fresh salad. I’m kind of excited for fall/winter when I came make soup without turning my kitchen into a sweaty steam room.
I found this Ikebana vase recently and was elated to actually get to use it. It’s a little hard to style so you have to use flowing/asymmetrical flowers like these pretty freesia.
Yes, I do actually know someone named Björn. Because I am cool and hip and aloof. I kept the table linens/styling pretty simple and minimal. If this had been a fancier dinner party I would have maybe added a flower or two for even more green.
When dinner is over, you can yell at your guests to get out and take their custom candles with them. These simple/inexpensive placeholders are a surefire way to make your everyday dinner party memorable. All the items shown here can be purchased with your Amex, so you can get money back on your purchases while you snag supplies for these easy candles. An added benefit is that people LOVE getting candles and once you have the kit you can make them all the time. They seem glamorous and expensive but they’re almost free. I chose to use a vessel that costs $9.95 but you could also use a simple water glass or something even cheaper and still achieve a glamorous high-end look.
Now if you’ll excuse me, I have to go eat some salad with Joan and Björn.
Love,
Orlando
Sources: Ikebana Vase, Serving Bowl, Silverware, Glass Cannister (for candle), Water Glass, Linen Napkin, Grasscloth Placemat, Candle Making Starter Kit (not shown).
This post was created in partnership with American Express. All opinions and ideas expressed are genuine and my own.


Looks so awesome, love that vase. Making your own candles looks easy and fun.
I love hosting dinner parties, and I think your ideas are awesome. Keep them coming!
I’m still giggling about Joan.
Wow! That’s such a simple, yet beautiful idea! Thanks for sharing 🙂 BTW; love the website design! Very clean.
Love the sweet candle DIY and the vessels that you used. And the freesia was a nice option for the interesting vase!
Jordana
p.s. Joan’s pantsuit…made me laugh.