Dear People Seeking Balance in Your Lives,
Does your life feel crazy, imbalanced, and out of control? Do you ponder why work either feels like a pitching machine throwing raw eggs at your face OR a lonely horse standing in a field wondering if anyone is ever going to come and pet him? Like you’re either way too busy or way bored because there’s nothing to do? Well if you’re feeling this way it’s probably because you don’t have a driftwood mobile to stare at. If you did you’d realize that all is right in the world. That there are so many reasons to keep on living. You’d step off that ledge, call your friend Becky, and be like “Hay Gurl, wanna see my mobile?”
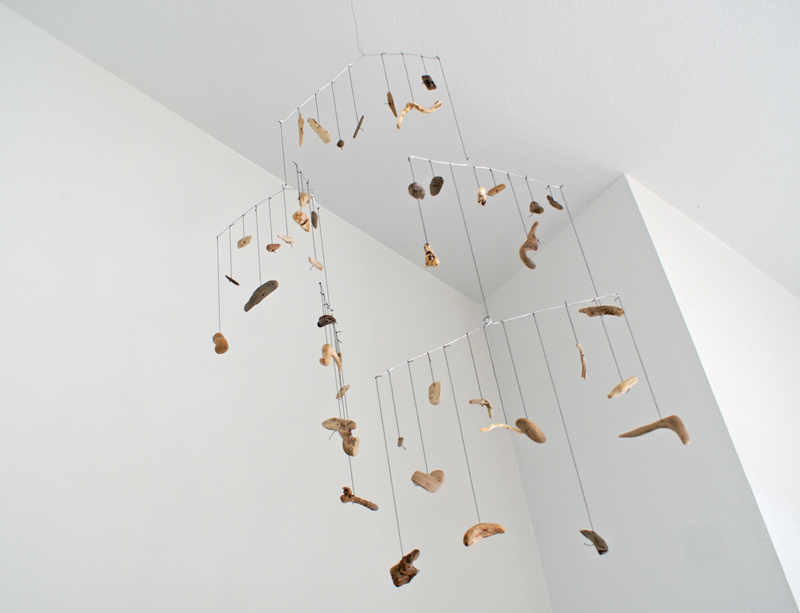
I was visiting my parents up in Sonoma County last week, hanging out with my cute little 2-year-old niece, when I came across a collection of driftwood my mother has been hoarding for years. “I’ve been meaning to make these into a mobile for a long time,” she said. At which point I screamed.
“WE MUST. WE MUST MAKE THE MOBILE TODAY. RIGHT NOW!”
And so we abandoned my adorable baby niece, left her to play with a box full of replacement Xacto blades, and began our journey of making our very first mobile. Below are images of the final product, along with a SUPER HIGH TECH step-by-step how-to guide.
WHAT YOU’LL NEED:
Wire-Cutting Needlenose Pliers
Awesome Collection of Driftwood or Other Objects
STEP 1: STRING YOUR OBJECTS
My mother has been collecting driftwood for years at California beaches (make sure NOT to do this at state parks or places where collecting is prohibited). We used a tiny drill bit (1/32″). Once you’ve drilled your holes, string the thread through the driftwood, tying a knot at the bottom to make sure they stay put. We tied quadruple knots to make sure they were big enough but you’ll have to feel it out to ensure your mobile doesn’t fall to pieces the second you put it up.
STEP 2: MAKE YOUR SUPPORTS
The building block of this mobile is galvanized wire. This is strong enough to support light objects, such as driftwood. If you are mobiling something else, you’ll need to use thicker wire or wooden dowels. The loop in the center is for attach it to other supports, the two loops at the end make sure everything you tie to it doesn’t fall off.
Base the number of supports on how large and wide you want your mobile to be. You can also add them as you go if you realize you have more objects to hang than you expected.
STEP 3: STRING YOUR SUPPORTS TOGETHER
Hanging the top support from a hook on the ceiling (or in a doorway), attach all the supports together. These early steps are the hardest because nothing is balanced yet. You will use the objects to balance the whole mobile.
STEP 4: ATTACH YOUR OBJECTS
I’m going to be honest, this is the most annoying and stressful part. Keeping everything balanced is pretty difficult. Add the driftwood pieces one by one, tying them to the wire supports tightly so that they don’t slide around. You can also dab a bit of white glue on each knot to make sure they stay put. When you add something to one side you have to add something of a similar weight to the opposite side. If you’re still struggling with getting things balance after you’ve adjusted all the objects, you can also adjust the wire to help balance things out. For example, if you have this:
…you can shorten the side that is too low. This changes the center of gravity and helps the support go back to being more horizontal. Like this:

Creating a mobile, like life in general, is a nearly impossible balancing act. I am sure that master Mobilers like Calder got really good at balancing theirs, but if it’s your first time making one don’t feel bad if it takes a while to get the whole thing to float and balance like you want it to. You have to be kind of zen about it. It really wont look good until the end when everything is perfectly aligned and you can finally stand back and watch all your little treasured objects wiggle around in the air above you on your gorgeous, handmade mobile.
Love,
Orlando


This is absolute gorgeous! I totally love the sharpie looking diagrams!
Wouldn’t that be a great way to make a permanent Christmas tree–
Love that mobile. I love that there are a lot of things on each “branch”. Very pretty!!
Love it!
My husband’s step-dad is a very talented amateur wood sculptor and he made my husband an great mobile along these lines years ago. He strung one piece of wood on each string and then carefully attached each end of the string to the cross pieces (each end to a different spot like an inverted triangle), varying the heights carefully. The way the strings of the pieces overlapped had a beautiful geometry and that, combined with the care with which he chose the wood and decided how each piece would hang, created a wonderful organic, kinetic sculpture. Folks might find it easier to balance their mobile this way and if done with care, it will still look gorgeous in 30 years.
Maybe everything doesn’t necessarily need to be perfectly balanced? Maybe a little wacky is ok?