Dear World,
Do you want a chandelier that’s uniquely you, but don’t know where to start? Well, you’re in luck, because a few months ago I made a delightful Orb chandy I’m calling Orb-lando. AND SO CAN YOU! Emily, my secret lover, and I used this chandelier for one of my favorite Secrets From A Stylist makeovers. It was a contemporary makeover, infused with Japanese influence and a kick azz modern art collection. Anywayz, onto the chandy.
Here is the initial drawing I made for inspiration:

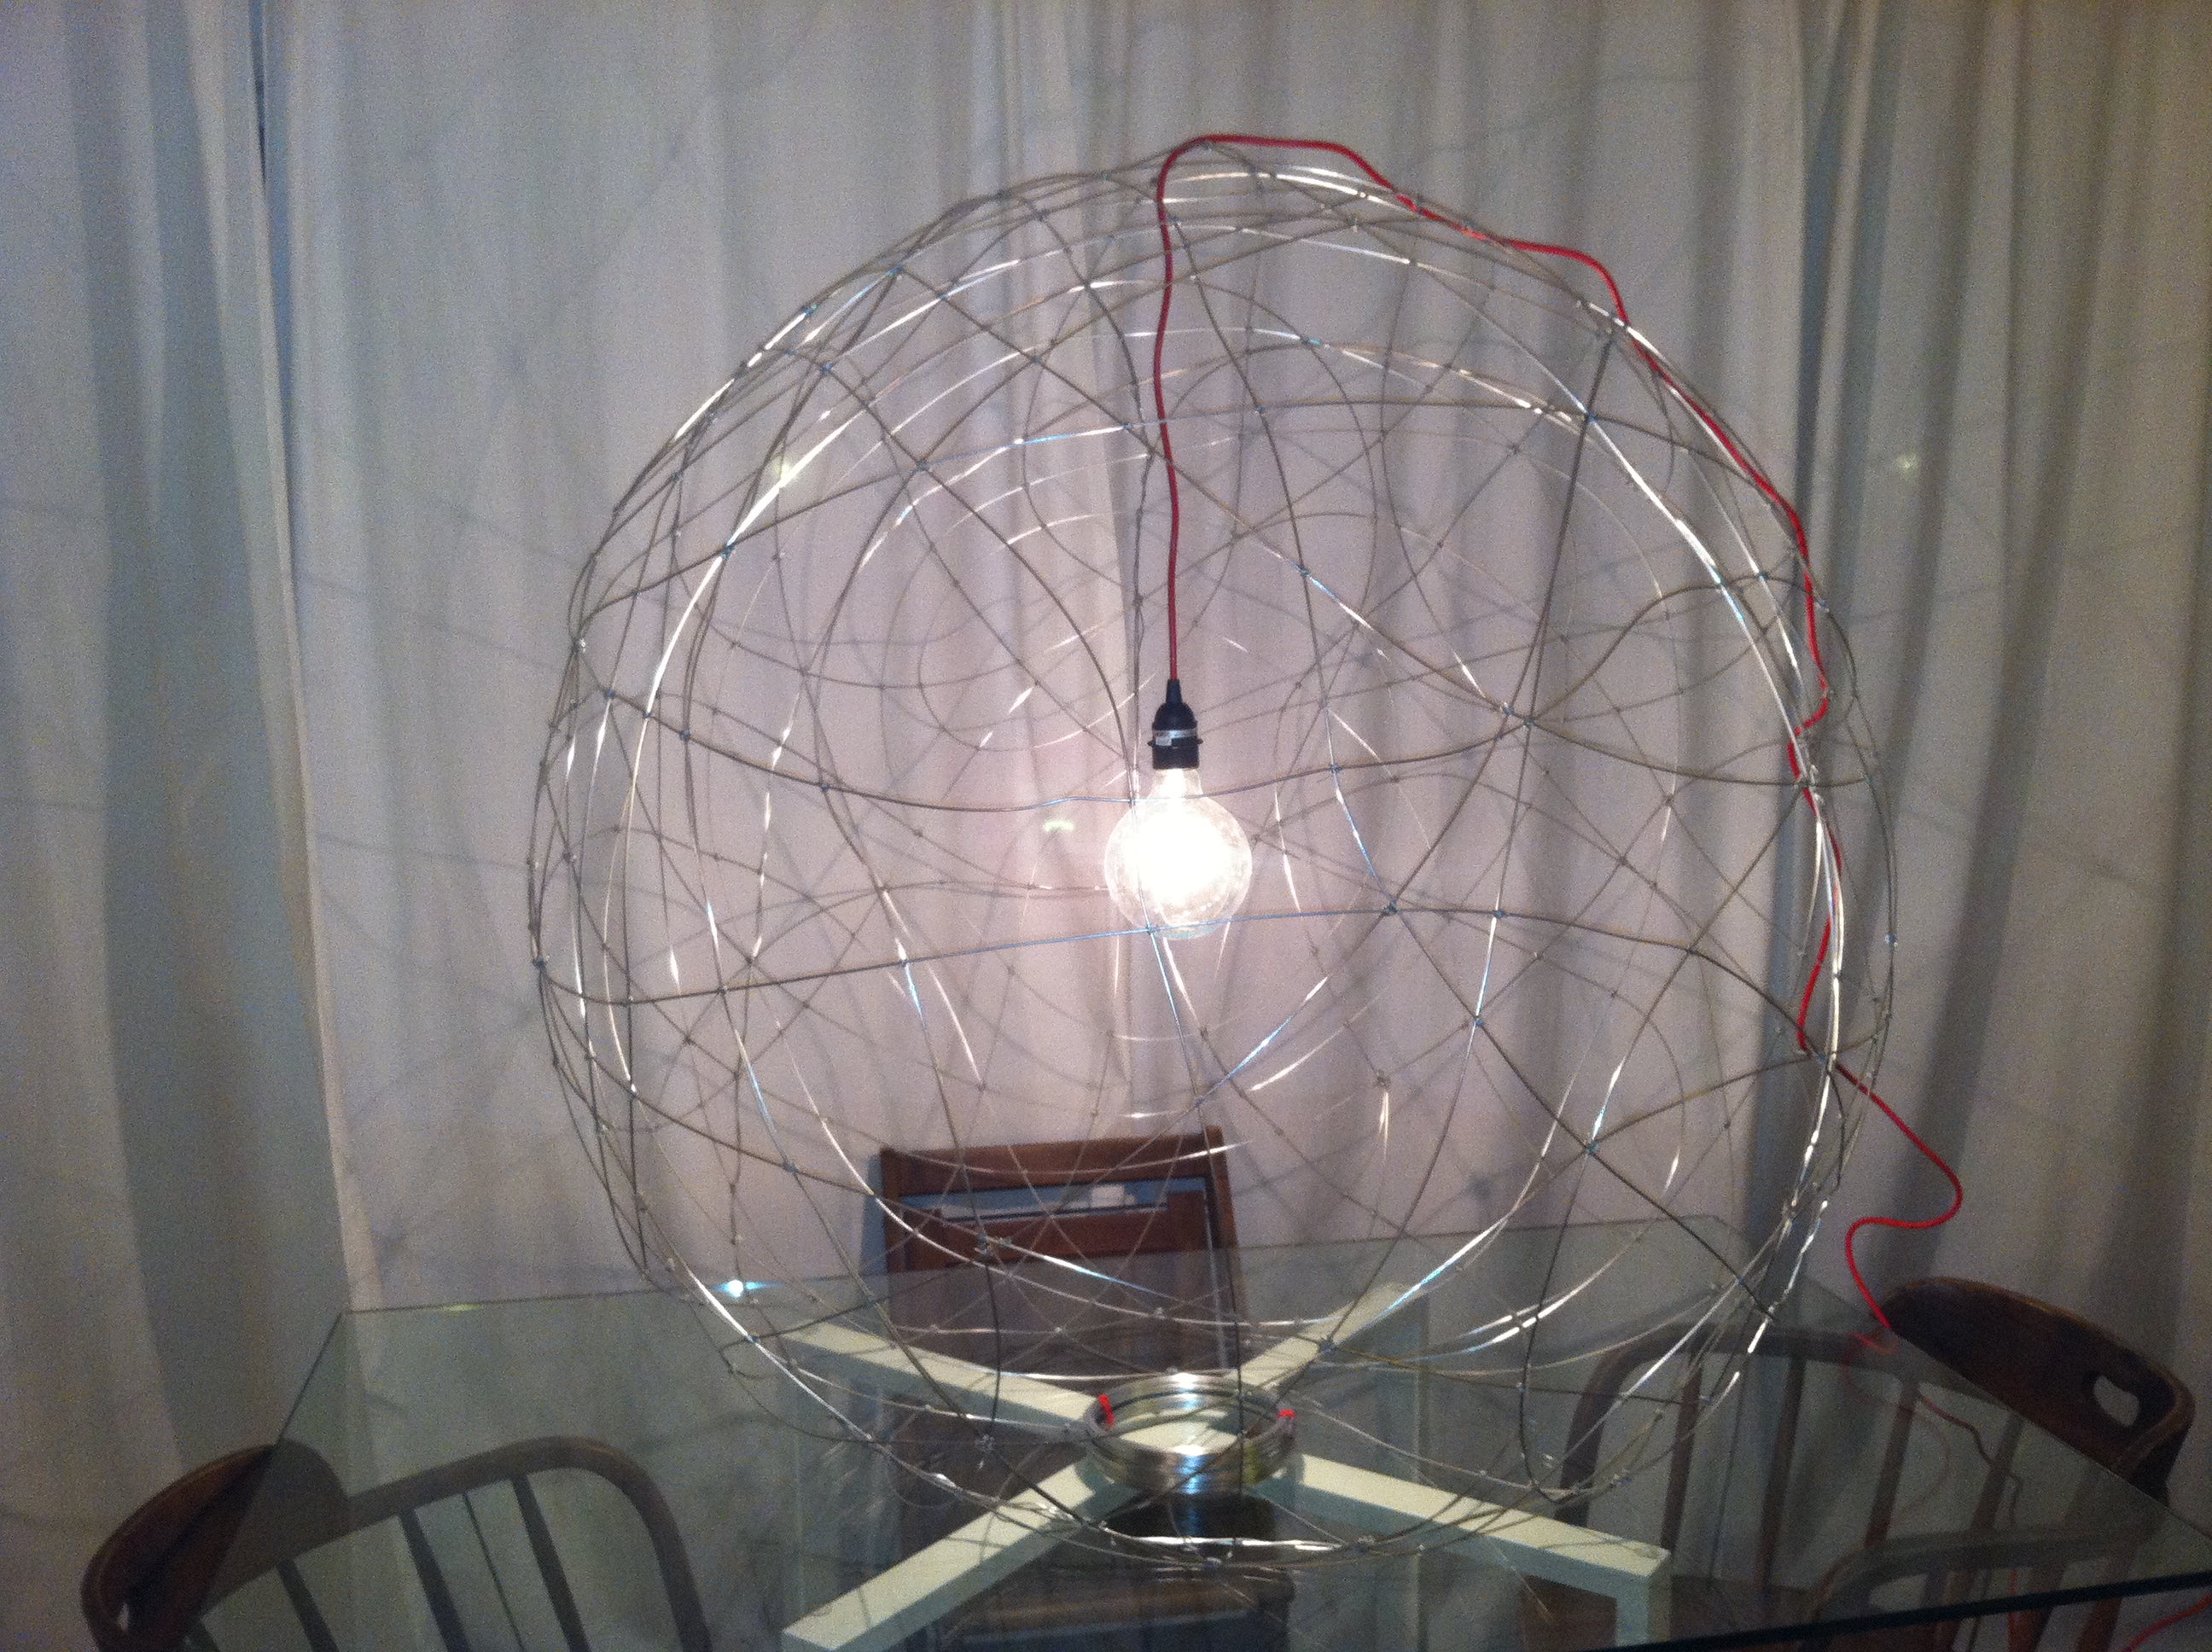
And here is how the actual Orb-lando turned out:


So now that all that boring stuff is out of the way, here’s how you make the thing.
Firstly, you’ll need the following supplies:
1. 14 Gauge Galvanized Wire (I used about 300 feet to do my 3′ wide orb):

2. Narrow Gauge Galvanized Wire (sometimes called “Craft Wire” or “Floral Wire”):

3. Any kind of chain meant for chandy hanging. If you’re smart, unlike myself, you’ll choose it in a color that corresponds with the color you choose to paint your orb.

4. Needle Nose Pliers (get the kind that have the cutting mechanism so you don’t have to keep picking up and putting down tools):

5. A G 40 Light Bulb. That’s the biggest you can get without messing with normal wiring/electrical loads (Or something. The light bulb store dude sort of confused me because he talked for too long when I asked him if he had any bigger bulbs. He just went on and on and on about wiring requirements etc. Don’t people realize that if you keep blathering about something that no one wants to keep listening to you because it gets totally boring and drawn out? Ooops, I just did the same thing):

6. We had an old light kit from CB2 on set so I used that, but you can use any light kit as long as the cord is long enough to reach the ceiling:

7. I painted my Orb-lando with this metallic “Dark Bronze” color. We also considered painting it a fun color like red but the bronze gave it a nice aged look. If you leave it raw eventually it turns roughly this color anyway, so we just sort of sped up the process (this is a trick we TV people love to do, because we work on a tight schedule and spend most of our time talking to models and the cast of “Glee.”):

PROCESS
Ok, so now to how you actually put this dumb thing together. I took process pictures but they looked stupid so I’ve decided to draw cartoons to explain.
STEP 1
First, make three wire hoops (from the 14 gauge wire) the size you want your Orb-lando to be. For example, if you want a chandy that’s 2′ wide, make a wire hoop that is 2′ wide. These hoops need to be sturdy enough to maintain their shape, and 14 gauge wire can be wobbly if your chandy is big, so it’s probably best to make your hoop double-thick (made from two pieces of wire wrapped around one another, like lovers on a moonlit night on the beach).

STEP 2
Using your thinner gauge wire, attach the three hoops together so they look like this. To be honest, this is the hardest part because even when it’s double-thick this wire wobbles all over the place (to understand how wobbly it is, imagine that you just told Santa a hilarious joke and now you have to make a chandelier out of his belly – which shakes when he laughs like a bowl full of jelly).

STEP 3
Add the chain. Come to think of it, you’d probably do this last but I accidentally drew it in and it kind of doesn’t matter when you add it. To connect the chain, use your 14 gauge wire for strength and your thinner gauge wire for extra support. On second thought, you should probably do this step last because it would be kind of annoying to do the next steps with the chain attached. Go on to step 4 and I’ll remind you to do this later. I love you and I’m sorry.

STEP 4
Remember Sigourney Weaver in Aliens? Well, for this part of the DIY pretend that your name is [Insert Your Name] Weaver and that your job is to weave and weave and weave 14 gauge wire together until your Orb looks like a giant scribble. The most important part of the weaving process is that whenever the 14 gauge wire intersects, you attach it together with a 3″ piece of the thinner wire (just wrap the thin wire around and point all the ends inward so they don’t cut anyone). This sounds easy, but it gets SUPER tedious because there are so many intersections. If you don’t bind your intersections the Orb wont be structurally sound, so it’s the most important part of the process.

STEP 5
Keep weaving until your Orb-lando is a lacy and complicated as you want. Make sure to leave a hole near the top big enough for the G 40 bulb to fit through. To test if your Orb is strong enough, try bouncing it on the floor (or any scratch-proof surface, preferably outside). If it can maintain it’s shape after a light bounce it’s probably strong enough to hang (if it’s too weak it will start to sag eventually, like my face).

STEP 6
Before you hang your Orb-lando, please choose a color to spray it (and your hardware) and do so in a protected outdoor area. You can leave your Orb raw, but know that it will probably not stay that bright silver color forever (it dulls a bit over time).
STEP 7
Add your light kit. Or have someone who isn’t deathly afraid of electrocuting himself do it. I don’t know how to wire stuff, so we had Contractor Chris (from “Secrets”) do it. My suggestion is that if you’re not comfortable you hire an electrician your wiring. I say that not only because I’m legally required to, but also because the only thing that scares me almost as much as me dying by electrocution is you dying by electrocution.
STEP 8
As a reminder, you can add your chain now and hang the thing.
STEP 9
Have a glamourous premiere party for your Orb-lando where you serve ridiculously expensive hors d’oeuvre and invite every celebrity you know. If you don’t know any celebrities, make one up! (“Oh her, that’s Auntie Flo, she invented the intercom and starred on ‘I Love Lucy’!”). Please be advised that if you refer to this light as anything but an “Orb-lando,” my legal team will be paying you a visit. Just kidding. Sort of.
Ok, well I hope you’re excited to make your own chandy. There will be challenges and there will be triumphs, but ultimately it could end up being the most fulfilling thing you do in your whole entire life.
Love,
Orlando
Okay I think I enjoyed your tutorial as much if not more than the actual light! Awesome!
I have been wondering what gauge wire you used. Loved it! Thanks for the tutorial.
IN LOVE. on the to-do list for new house. better than the string-and-balloon thingymebob. love me some proper wire … and the war wounds that come with it!
LOVE it!!!!!!!
You had me at “structurally sound” (step 4) 😉
Now, THAT is a groovy tutorial! Yay! Thanks for drawing the cartoons. In progress photos are generally more confusing than helpful. Or maybe it’s just me. Anyhow, comics = way more my speed. Super rad.
Thank you! I’ve been looking for something to hang over my dining table and this might just do it. Love your humor! Thank you again… and again
Oh, thank you! And there was not a beach ball involved…skillz!
Orlando,
I am not much of a gusher (although I love others that do & have several in my family 🙂 but your Orb-lando is definitely a reason to GUSH!!!
Thank you for taking the time to share your creation. I wish you & Emily all of the best in your show. Here is one of my favorite quotes by one of the Grand Dames of design & life:
“. . . one of the goals of life is to try and be in touch with one’s most personal themes — the values, ideas, styles, colors that are the touchstones of one’s own individual life, its real texture and substance.”
Gloria Vanderbilt
Hey Orlando, well done! You had me from start to finish. Hope all is well.
super chic! totes borrowing (read: stealing) this for my show as well! Look for Orb-londos on Fox’s Kitchen Nightmares this fall/winter. 😉
You’ve made my day! I’ve already discovered your blog and I’m so glad! I just was looking for a Random Light Hack on a budget and this definitely what I was looking for – but wasn’t smart enough to get to it by myself. Thanks blogland and the Gods of the Internet! 😀 I think I’ll try it in white.. uhmm… not sure – but I’ll let you know!
beautiful. i’m going through all the rooms of my house in my head to see which room needs an Orb-lando. hmmm…
THANKS!!! I was scouring the web the day after I saw the show for a tut. Your Orblando is genius. I can’t wait to try to make a smaller version!
LOVE this chandy! I’m a little intimidated to even try though. Argh! Can you just make them and sell to me? : )
It’s going to take too long. Can you make it for me?
enjoyed the post! maybe far too much when I missed the part about inserting the light kit and screwing in that plump lightbulb… it does not seem to fit thru the finished weave… ?
As soon as I saw you carry it in on the SFAS episode, I gasped! I am so excited that I can have this hanging above my kitchen table soon! Thanks so much for sharing your awesome idea and I promise it will always be referred to as an “Orb-lando”. :o)
That was the most entertaining DIY tutorial I’ve read! You’re hilarious as well as talented!
I’m in a rental that won’t let me change anything, so I shall be making mini Orb-landos for decoration. Yay!
I second what Barb H. said! You are awesome!
fabulous but how did you get the lightbulb in and how do you change it? Thanks
Cat
Oh yeah I totally forgot to mention that. Basically, you leave a hole (near the top) big enough for the bulb to fit through. The Orb is so visually confusing that you don’t really notice the hole.
This is fantastic and your writing always is always a pleasure to read.
Meh. Remove an always from that. Redundant girl is redundant.
I’ll be honest, didn’t like the orb at all. A bare lightbulb inside a bunch of wire. You can do better than that.
afraid of an actual critical eye?
Haha! Ok. Everyone is entitled to an opinion!
Those who can create, those who can’t critique. The beauty of it is its simplicity and ingenuity on the spot and on a budget. How is the creator of something supposed to reply when someone stops by for a little nonconstructive criticism? Hopefully *you* can do better. Will wait for your blog and tv show to unleash the critical eye.
Until then, my orb and I are going to have ball ! Thanks for the instructions! It’s already in the works. Hope it turns out as beautiful 🙂
Lindo!
Hi, I loved this episode of the the show. I really loved that dining room table. Do you know the specifics of it? I can’t find anything about it online. Thanks!
mzudar@gmail.com
I not only love this beautiful “chandy” (and can’t wait to make one for our home!), I absolutely love how the instructions were written. Talent, wit & handsomeness. Yeah, it must suck being you.
Orb-lando light: epic; Helpful cartoons: epic-ER. Thanks for the tutorial! I stuck this up on my Pinterest board, it made my head spin 🙂
Was this light enough that you could have done it without a chain – in other words, just a cord properly connected (or a thin wire maybe)?
Yeah, you’re right it’s not that heavy. I think a cord would support it if it were thick enough. Probably the CB2 cord kit I used would have supported it but it wasn’t long enough (the ceilings in that place were like 30 feet high).
Thanks for the tutorial! Do you think I could make an Orb-lando as a lampshade rather than a chandy? Maybe on some kind of industrial base? Obvi the chandy rocks, but I live in an apartment and don’t want to install lighting in a rental.
Great tutorial! I’ll definitely be making this, since I can’t afford the Bertjan Pot version. 🙂
Would copper wire work?
thank you thank you thank you!
I looked this up as soon as I saw that episode!
I saw something similar to this at West Elm and WANTED it. Thanks to you, I can MAKE it! Your tutorial was very fun to read, yay! 🙂
This was so hilarious and great. I am now subscribing to your post… thank HowAboutOrange for sharing!
Thanks for making me smile 🙂
Bit cheeky eh?
I join the ranks and bow at your talented feet.
TA TA fer now… E
Orlando,
I love you + I love the Orb-lando so I thought I would make the logically stylish choice + create an Orb-lando for my pad. However, you failed to mention that this thing is a pain in the arse. I started this monster + after 5 hours of initial labor I decided to take a break. Now, a week later, it still sits in my living room with the beginnings of dust blanket collecting over it as I eye it daily with hate. Please come to Kansas City and finish this beast for me.
I’m in the process of doing it!
Step 2 got the best of my patience and good will and my hands are kinda cut lol but it’s worth it. Now it’s starting to look like a orb. Wish me luck with the intersections.
Bye
Great tutorial, thanks so much for sharing. I love the look and it particularly goes well with the natural wood table and dining room in the display. Great idea inspiration!
Love the chandy and your sense of humor !Thanks for the ideas and for making me laugh ! Terry
Its beautiful! My room won’t accommodate such a large orb (unfortunately), but I will making a smaller one for my home. Thanks for the detailed (& entertaining) instructions.
Hi Orlando,
I didn’t see a contact email, so hope you don’t mind that I post here. Just wanted to let you know that I recommended your DIY orb to some clients. I linked to your instructions when I posted it on the journal originally, but FINALLY have gotten around to properly putting up a page on the project.
http://jilldanyelle.com/brooklyn-loft
I credit and link back to you, hope you are okay with that, but please contact me if it is a problem. Just wanted to say thanks for providing the DIY. I gave them a few ideas, but was rooting for some little Orblanditos to be born. Waiting for the photos.
Best Wishes.
Just purchased a new domicile w/very outdated lighting. Knew I needed a sphere for the tall entry but just couldn’t handle the $2,400.00 price tag for the dreamy fixture at Restoration Hardware. Having the “can do it myself” attitude I knew there was a way with wire….so thanks for the instructions it will make the process ever so much easier. Love-love the outcome of yours.
I absolutely love this tutorial! I’ve been wanting some kind of an interesting pendant light for my baby’s nursery, I was going to settle on the string pendants… but Now I can be truly happy!!! This is perfect and add interest to the ceiling to stimulate my baby’s mind. I’m hoping to add some beading or something, but I’ll figure it out. I’m totally in LOVE!!! Thank you Orlando!!!
Okay, so I followed your instructions with amazing results. Thank you so very much for the encouragement to just jump in and get going with the step by step how to. I made one change to your instructions and retained the lamp portion of my existing chandelier-just removing the horrid glass/shiny brass portion of the “shade” and spraying the light portion with oil rubbed bronze paint as I did the Orb-lando Chandy. It looks amazingly modern and my friends are dying I did it myself….which is always SO great. Love, love, love!
ThiS is really cool and I’ll be attempting it soon. I love the way the instructions are written, it had me smiling the whole time 🙂
I followed the instructions, and I got amazing results as well– for the structure. Unfortunately, when I put the light in and hung it up in the room, it creates a very ominous almost barbed wire looking shadow on the walls. Of course, I never thought of that during the two hours that it took me to make it. Anybody have that issue as well? If so, were you able to remedy it?
I too have the same effect,butthinkit’s actually quite lovely in my space…perhaps a lower watt light bulb could help.
Orlando I so much love your Orb-lando! I’m absolutely blogging about this! Scheduled to be published in about 2 from now!
LOVE the sphere and the great instructions! This will definitely be a future project for me. Thank you so much.
You are so funny! I love this tutorial. I’m thinking about trying this (on a smaller scale) over a desk. Fun times are to be had!
Phenomenal Share! Very generous too! TY
This is fantastic and actually fun to read. Thanks
Love!
My fingers are bleeding as I type this, but my beautiful Orb-lando is smiling down upon me from it’s new resting place above the dining room table. Looks great! Thanks for the inspiration and the hilarious (and helpful) step by step instructions!
Made it! A little tedious with the thin wire, but VERY fun to make. Thanks a lot. When are you comming to Chile! Let us know, regards from the end of the world!
I loved this pendant so much that I added it in the mix of amazing DIY light fixtures on my little blog today.
http://mymulberrytree.blogspot.com/2013/02/20-diy-lighting-ideas.html
Mmmmm, I think I might be slightly in love with you. Attractive, creative and funny *sigh*
hi,
i am not a diy person so this is really new.. these might be silly and i hope i could draw pictures to show you what i meant but here it goes..
Q1: how do you connect the 2 ends for each of the three basic hoops? do you make a hook on one end of the hoop or do you just tie them overlapping together?
Q2: how do you weave the wire into the hoops? do you cut them in specific lengths first and then weave? i couldnt weave when my wires are long, i had to pull and drag each time and i got stuck after the first 3 rounds of weaving..
Thank you in advance!
Hi, hoffe ich darf hier auch mal was nettes kommentieren 🙂 und wenn ich nicht zu frech bin, stelle ich mich auch mal kurz vor *grins*.
Bin die Anna, 29J und leider immernoch Single 🙁 aber vielleicht ändert sich das ja bald, wenn du dich ganz schnell bei mir meldest. Suche einen netten Mann, mit dem ich durch dick und dünn gehen kann, aber solange ich ihn nicht gefunden habe, sage ich zu heißen Affären auch nicht nein *grins*.
Würde mich freuen, wenn du mir schreibst. Findest mein Profil auf Lustflirto . COM unter dem Nick Annaina…
Hoffe dann bis gleich.
I’m with Irma who you did not answer.
“Q1: how do you connect the 2 ends for each of the three basic hoops? do you make a hook on one end of the hoop or do you just tie them overlapping together?
Q2: how do you weave the wire into the hoops? do you cut them in specific lengths first and then weave? i couldnt weave when my wires are long, i had to pull and drag each time and i got stuck after the first 3 rounds of weaving.”
Also, how do you remove the reinforcing double wiring? And a photo of the bulb opening would help.
Without these steps your instructions are not complete and simply tease.
OMG you rule. Can you just do this for me? I’ll pay you. I have 4 boys and I’m too tired from making them food all day. I’ll cook you a meal too. 😉 seriously though, I love this.
Hey there just wanted to give you a quick heads up and let you know a few of
the images aren’t loading correctly. I’m not sure why but
I think its a linking issue. I’ve tried it in two different
web browsers and both show the same outcome.
Well found this tutorial and I am making one now. No quite as big, but just as impressive!!! Can’t wait to get it finished and hung…
So clever!!!! I love, love, love, love, love you for sharing! Thank you so much! 🙂